오늘 아침 개발자 이메일을 통해 hUC Web 버젼이 공개 되었습니다
영문 PDF 파일 :
웹 버젼 특징
장점 :
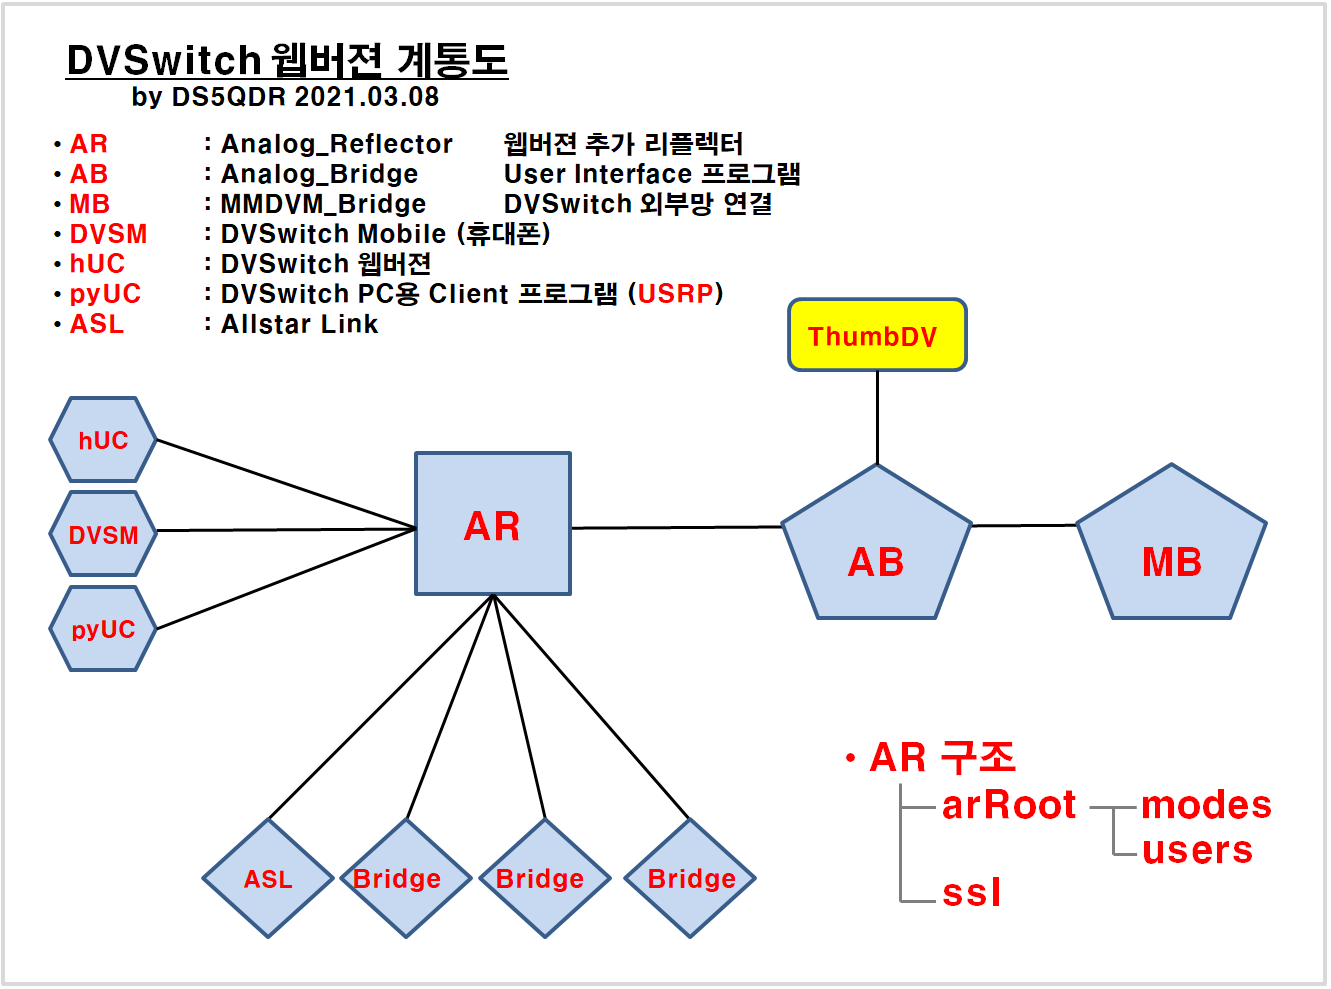
- 동시에 여러명이 AR (Analog_Reflector) 에 접속하여 교신 할 수 있음
> DMR/DSTAR/YSF/NXDN/P25 Mode : AR <-> AB <-> MB <-> 외부 TG/Reflector 연결
> Intercom Mode : AR에 접속된 사용자 간 교신
- AB에 ThumbDV 연결 시 AR 접속자 DSTAR 깨끗한 Voice로 외부 교신 가능 (SYSOP 권한 부여자에 한함)
- 소규모 단체의 라운드 교신 가능함 (Intercom Mode)
- DMR STFU Mode 사용 시 교신 중 TG 이동 가능합니다 (일부 TG에서만 지원 중이고 점차 확대 진행 중)
- AR 접속 일반 사용자는 웹 버젼 혹은 DVSM으로 접속 가능
- SYSOP은 접속자별 권한 부여 및 통제 가능
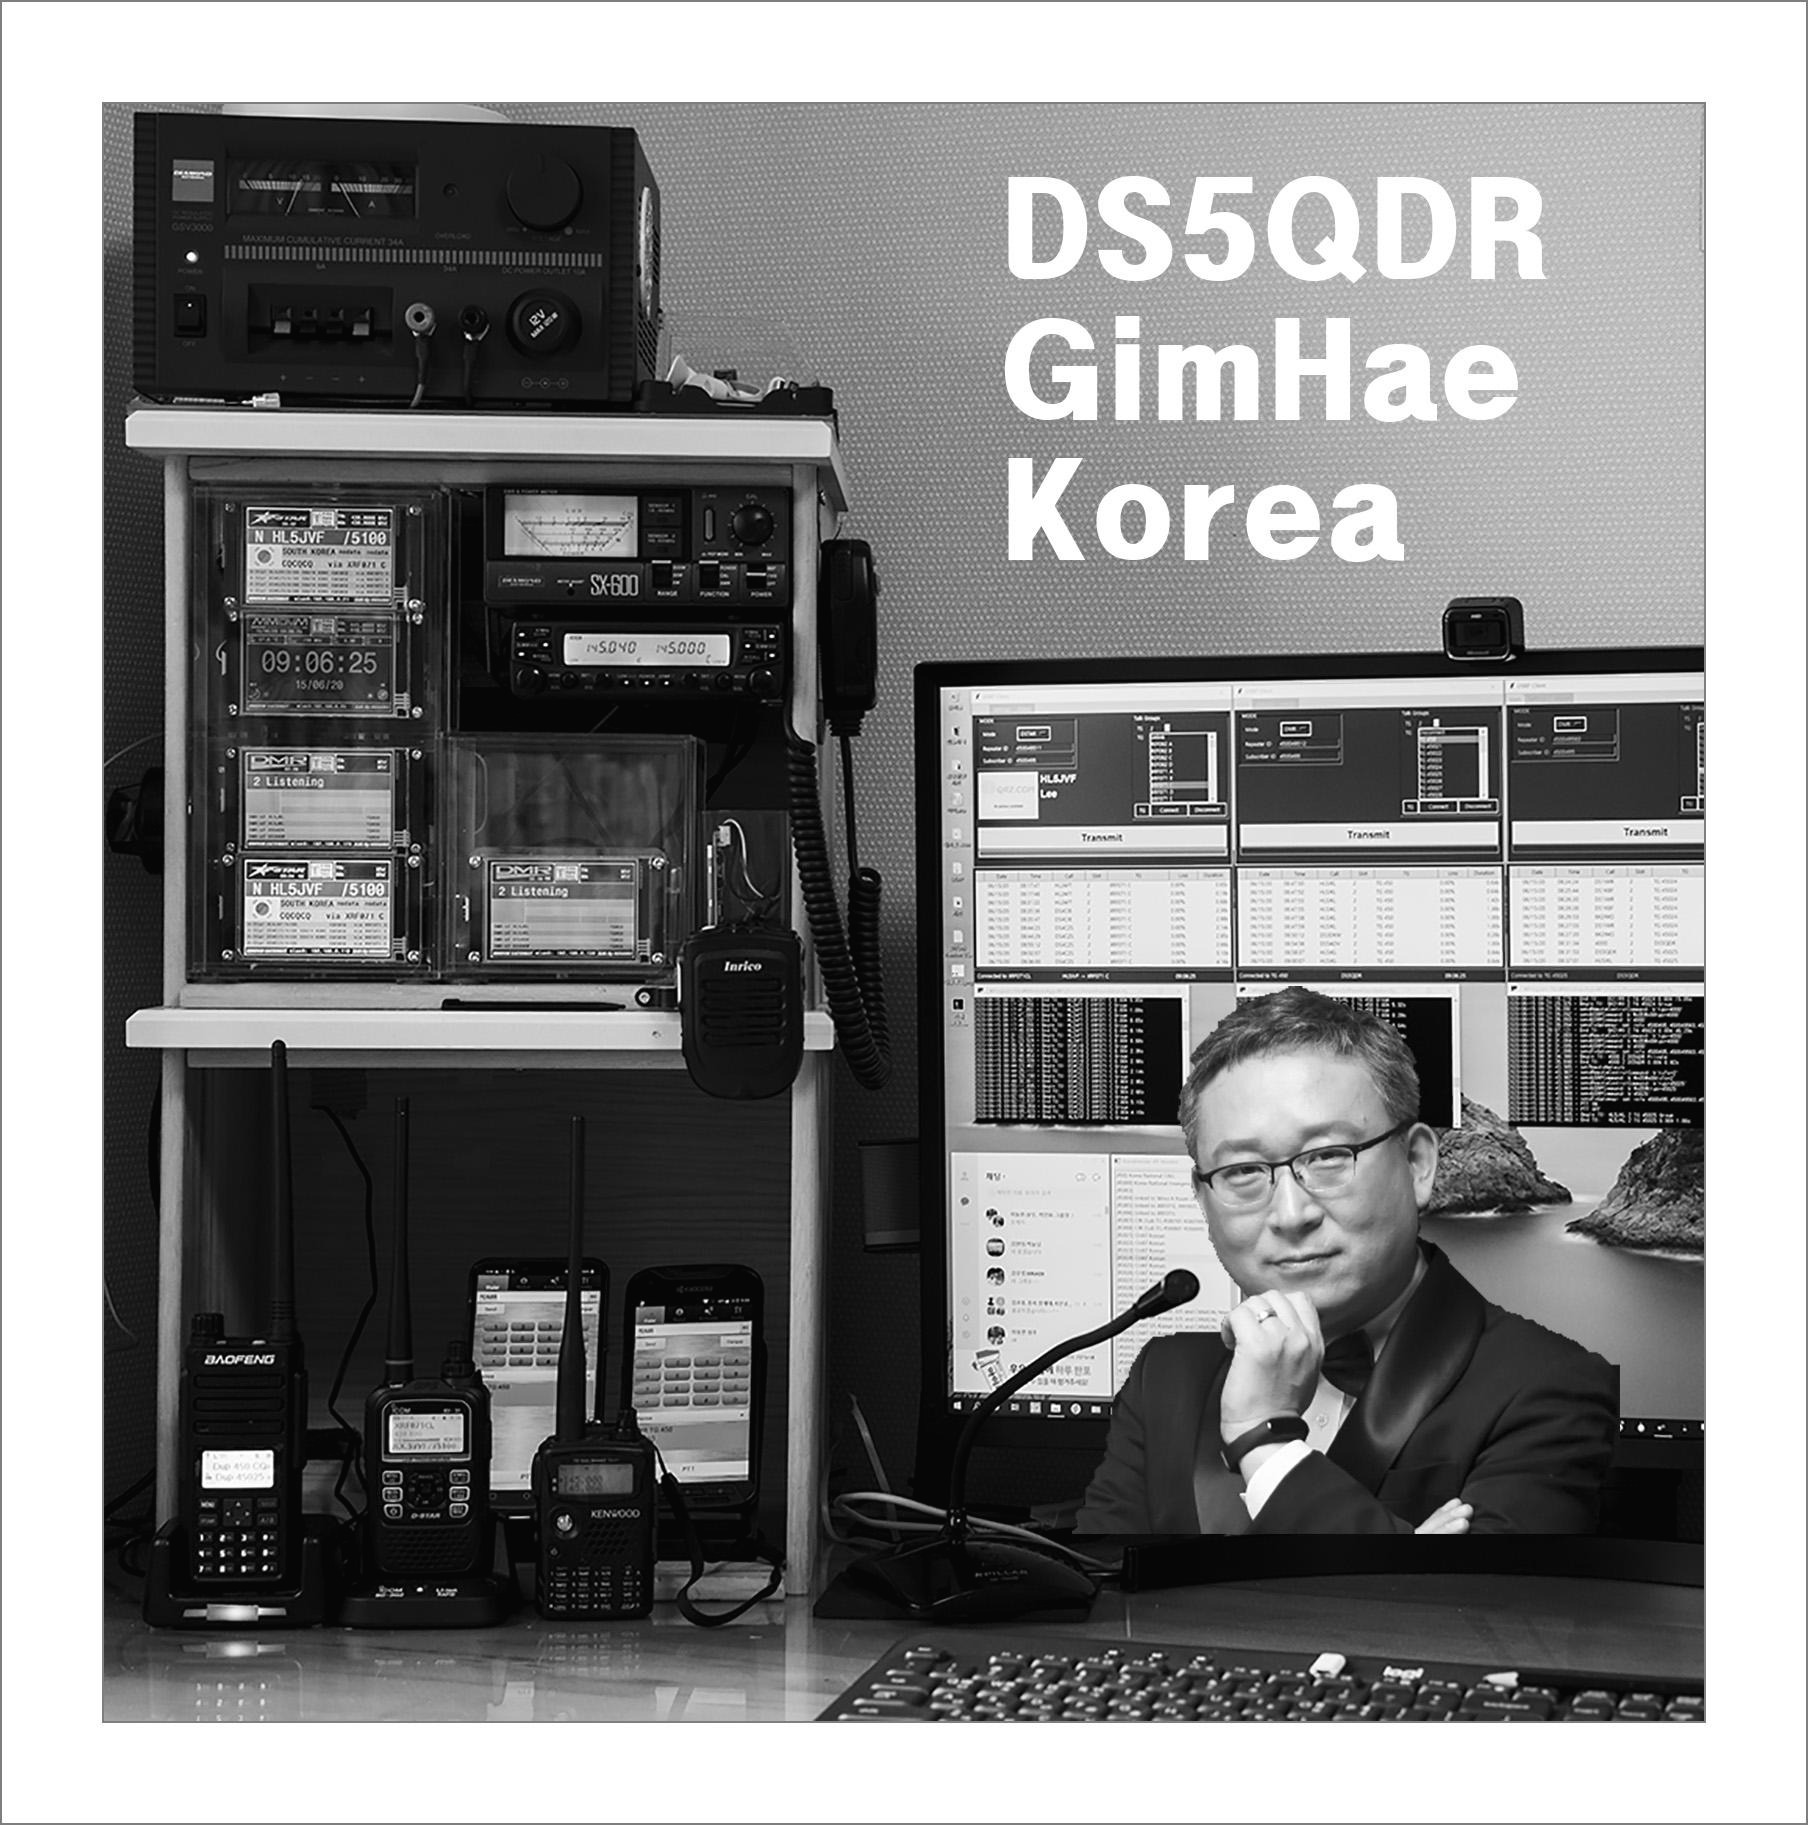
- 자신의 ID로 PC, USRP, 태블릿 등 다양한 기기로 동시 접속 각각 교신이 가능합니다 (아래 사진 참조)
단점 :
- 설치 과정이 복잡함
- 접속 사용자 개인별 별도 설정을 해주어야 함 (권한에 따라 TG 변경, 송신 등 제어할 수 있음)
- 기타
설치 단축 명령어 (아래 명령어만 실행하면 AR 설치가 됩니다)
sudo apt install analog-reflector
cd /opt/Analog_Reflector
cd ssl
sudo ./mkcerts.sh
ls -l
cd /opt/Analog_Reflector
sudo nano Analog_Reflector.json
sudo ./Analog_Reflector user DS5QDR 4500xxxyy 4500xxxyy password 11
sudo systemctl start analog_reflector
sudo systemctl status analog_reflector


설치 방법
- 반드시 순서대로 하나씩 실행해야 됩니다
- 실행 중 에러가 발생되면 해결 후 다음단계로 넘어가야 합니다
- 상당히 복잡한 절차를 거쳐야 실행이 됩니다
- 편집 시 양식을 바꾸거나 변형시키면 실행이 안됩니다
아래 내용으로 실행 시
- 치명적인 오류 발생으로 기존 DVSwitch 서버가 작동 안될 수 있습니다
- DVSwitch 서버 스스로 설치 가능하신 분만 진행하시길 권해드립니다
만일을 위해 현재 DVSwitch SD Card를 백업받으실 분은
아래 링크 내용 참고하시기 바랍니다
2021-03-03 Tip : RPi DVSwitch Clone SD Card (복제) (tistory.com)
전체 설치 구성은
1단계] 기존 DVSwitch update & upgrade
2단계] Analog_Reflector 설치
3단계] ssl 보안 설치
4단계] Analog_Reflector 설정
5단계] 사용자 등록
6단계] 각 모드별 TG/Ref 수정
7단계] 교신
으로 되어 있습니다
1단계] 는 반드시 실행하셔야 합니다 기존 DVSwitch에 웹버젼에 맞는 기능이 추가되어야 합니다
2단계] 는 비교적 간단합니다
3단계] 는 mkcerts.sh 실행하여 보안 파일을 설치해야 합니다
주의사항은 mkcerts.sh가반드시녹색으로되어있어야실행이됩니다
4단계] 는 기존 Analog_Bridge.ini 파일과 새로 설치된 Analog_Reflector.json 간
usrpTx/Rx Port를 일치 세팅하여야 하고
추가로 mobilePort를 설정을 통해 DVSM/pyUC/USRP 용 Port를 설정하여야 합니다
5단계] 는 사용자 등록 단계로 Analog_Bridge에 접속하는 사용자 개인별 권한 등록입니다
(1: 송수신, 2: TG변경, 8: SYSOP 권한)
6단계] 는 각 모드별 TG/Ref 수정 등록입니다
7단계] 는 본격적으로 교신입니다
충분히 인지한 상태에서 아래 내용을 하나 하나씩 실행하시면 에러 없이 설치가 가능합니다
웹 버젼 특징
장점 :
- 동시에 여러명이 AR (Analog_Reflector) 에 접속하여 교신 할 수 있음
> DMR/DSTAR/YSF/NXDN/P25 Mode : AR <-> AB <-> MB <-> 외부 TG/Reflector 연결
> Intercom Mode : AR에 접속된 사용자 간 교신
- AB에 ThumbDV 연결 시 AR 접속자 DSTAR 깨끗한 Voice로 외부 교신 가능 (SYSOP 권한 부여자에 한함)
- 소규모 단체의 라운드 교신 가능함 (Intercom Mode)
- DMR STFU Mode 사용 시 교신 중 TG 이동 가능합니다 (일부 TG에서만 지원 중이고 점차 확대 진행 중)
- AR 접속 일반 사용자는 웹 버젼 혹은 DVSM으로 접속 가능
- SYSOP은 접속자별 권한 부여 및 통제 가능
- 자신의 ID로 PC, USRP, 태블릿 등 다양한 기기로 동시 접속 각각 교신이 가능합니다 (아래 사진 참조)
단점 :
- 설치 과정이 복잡함
- 접속 사용자 개인별 별도 설정을 해주어야 함 (권한에 따라 TG 변경, 송신 등 제어할 수 있음)
- 기타
설치 방법
- 반드시 순서대로 하나씩 실행해야 됩니다
- 실행 중 에러가 발생되면 해결 후 다음단계로 넘어가야 합니다
- 상당히 복잡한 절차를 거쳐야 실행이 됩니다
- 편집 시 양식을 바꾸거나 변형시키면 실행이 안됩니다
아래 내용으로 실행 시
- 치명적인 오류 발생으로 기존 DVSwitch 서버가 작동 안될 수 있습니다
- DVSwitch 서버 스스로 설치 가능하신 분만 진행하시길 권해드립니다
만일을 위해 현재 DVSwitch SD Card를 백업받으실 분은
아래 링크 내용 참고하시기 바랍니다
2021-03-03 Tip : RPi DVSwitch Clone SD Card (복제) (tistory.com)
전체 설치 구성은
1단계] 기존 DVSwitch update & upgrade
2단계] Analog_Reflector 설치
3단계] ssl 보안 설치
4단계] Analog_Reflector 설정
5단계] 사용자 등록
6단계] 각 모드별 TG/Ref 수정
7단계] 교신
으로 되어 있습니다
1단계] 는 반드시 실행하셔야 합니다 기존 DVSwitch에 웹버젼에 맞는 기능이 추가되어야 합니다
2단계] 는 비교적 간단합니다
3단계] 는 mkcerts.sh 실행하여 보안 파일을 설치해야 합니다
주의사항은 mkcerts.sh가반드시녹색으로되어있어야실행이됩니다
4단계] 는 기존 Analog_Bridge.ini 파일과 새로 설치된 Analog_Reflector.json 간
usrpTx/Rx Port를 일치 세팅하여야 하고
추가로 mobilePort를 설정을 통해 DVSM/pyUC/USRP 용 Port를 설정하여야 합니다
5단계] 는 사용자 등록 단계로 Analog_Brideg에 접속하는 사용자 개인별 권한 등록입니다
(1: 송수신, 2: TG변경, 8: SYSOP 권한)
6단계] 는 각 모드별 TG/Ref 수정 등록입니다
7단계] 는 본격적으로 교신입니다
충분히 인지한 상태에서 아래 내용을 하나 하나씩 실행하시면 에러 없이 설치가 가능합니다
절대 한가지라도 건너뛰거나 에러 발생 시 다음 단계로 가시면 작동이 안됩니다
기존 DVSwitch Server 에 설치하고자 하시는 분들은 아래 순서에 따라 설치하세요
[출처 : [Analog-Reflector] How to add Analog_Reflector(AR) to an existing DVSwitch Server ]
개발자로부터 받은 이메일 내용을 보완하여 작성하였습니다
붉은색 글자 위주 실행하세요
하시면 됩니다
1: Read the whole post.
2: Does everything make sense?
3: Do you have a system to test on?
4: Please feedback comments.
How to add Analog_Reflector(AR) to an existing DVSwitch Server.
(기존 DVSwitch Server에 AR 추가 방법)
For the purposes of this how-to we are going to make the following assumptions:
1: You have an existing DVSwitch Server installation.
2: You access the Server with DVSwitch Mobile (DVSM) or the Python client(pyUC)
3: You use the server to access digital modes only. Everything is working well.
Things that you need to know:
1: The fully qualified host name of your server if you are going to use that to access the server (example: server.dvswitch.org)
2: The IP address of your server
3: The UDP port you use in DVSM or pyUC to access your server.
1단계] 기존 DVSwitch update & upgrade
Lets get started. Make sure your server is up to date:
1 : Red Color is commands
2 : sudo apt update
3 : sudo apt upgrade -y
위 1, 2, 3 을 실행후 재부팅 하세요
4 : sudo reboot
If any of the above commands produce errors, warnings, failures or bad words, stop and ask
If the upgrade installed or updated any programs, reboot
Log back in to your server
재부팅 후
2단계] Analog_Reflector 설치
1 : Red Color is commands
Let's install Analog_Reflector
2 : sudo apt install analog-reflector
를 실행하세요
If all went well, you now have Analog_Reflector installed on your server. Let's do some quick configuration and testing.
2번이 정상적으로 실행이 되면
3 : cd /opt/Analog_Reflector
4 : ls
You should see the following:
4개의 파일/디렉토리 가 보이면 정상입니다
Analog_Reflector Analog_Reflector.json arRoot ssl
3단계] ssl 보안 설치
5 : cd ssl
6 : ls -ㅣ
You should see the following:
아래 파일이 보입니다
mkcerts.sh

This is the script that will create a certificate for your server so you can run the HTML Client(hUC) with https://your.server
만약 위 mkcerts.sh 파일이 위와 같이 녹색으로 표시되지 않으면
7-1 : sudo chmod +x mkcerts.sh 실행 후
7-2 : sudo ./mkcerts.sh 실행
에러 없이 실행되어야 다음 단계 가능합니다
This should complete without errors.
Let's make sure we are ready to continue:
8 : cd /opt/Analog_Reflector
9 : ./Analog_Reflector -v
You should see this:
아래와 같이 표시되면 정상입니다
Analog_Reflector Version: 1.1.21
10 : sudo ./Analog_Reflector -f Analog_Reflector.json
위 명령어를 실행하면 아래와 같은 내용이 표시됩니다
You will see something like this:
I: 21-03-02 08:01:02 Analog_Reflector:
I: 21-03-02 08:01:02 ==
I: 21-03-02 08:01:02 Version: 1.1.14
I: 21-03-02 08:01:02
M: 21-03-02 08:01:02 Server running in Production mode
I: 21-03-02 08:01:02 SSL Certificate for these addresses: DNS:localhost, DNS:dvswitch-server, IP Address:192.168.190.52, IP Address:127.0.0.1, IP Address:162.256.186.81
I: 21-03-02 08:01:02 SSL Certificate expires: Mar 2 12:53:19 2022 GMT
I: 21-03-02 08:01:02 WebSocket server ready on port 443 ...
I: 21-03-02 08:01:02 USRP client is listening at port : 12346
I: 21-03-02 08:01:02 Server ip :0.0.0.0
I: 21-03-02 08:01:02 Server is IP4/IP6 : IPv4
I: 21-03-02 08:01:02 Using Analog_Bridge at : 127.0.0.1:12345
E: 21-03-02 08:01:02 AMI Error: connect ECONNREFUSED 127.0.0.1:5038
E: 21-03-02 08:01:02 Turning off tune rights for AllStar Node 1999
I: 21-03-02 08:01:02 MQTT broker connected at "mqtt://localhost:1883" with base topic "dvswitch/DVSwitch/Analog_Reflector"
I have edited the above to remove some information we don't really care about and to reduce the length of this document.
If you see any errors, warnings, failures or bad words, stop and ask (other then AMI Error: connect ECONNREFUSED 127.0.0.1:5038 This is because you are not running AllStar)
OK, we are ready to continue.
11 : Control-C Ctrl-C 눌리고 빠져 나옵니다
4단계] Analog_Reflector 설정
기존 DVSwitch 에서 USRP Port 설정값 확인
12 : 기존 USRP Port 값 (예 : 51000) 을 메모 기록하고 USRP Port 값을 50000로 세팅하세요
We will now configure DVSwitch Server (actually Analog_Bridge) to talk to Analog_Reflector.
12-1 : dvs
12-2 : Select 01 Initial Configuration
12-3 : Select Yes to continue
12-4 : Follow the questions, you will be presented with your existing values.
12-5 : When asked for your USRP port WAIT
I told you above you needed to know the UDP port DVSM is using to access your server. Remember this value.
For the purpose of this how-to enter 12345
12-6 : Select your local BM server (if needed)
12-7 : keep the password
12-8 : Select you AMBE Vocoder
12-9 : Yes to continue
12-10 : Select OK to return to menu
12-11 : Select 05 Exit
That is a LOT of steps to edit the USRP port. This will change. I apologize.
Now we will edit the Analog_Reflector configuration file Analog_Reflector.json
13 : cd /opt/Analog_Reflector
14 : cp Analog_Reflector.json Analog_Reflector.json.save 설정 오류를 위해 백업
15 : nano Analog_Reflector.json
아래 설정이 매우 중요합니다
따음표(") 없애면 안됨)
You will see this:
{
"nodeName":"DVSwitch",
"dmrID":"1234567", <--- 자신의 DMRID 를 입력
"abAddress": "127.0.0.1",
"usrpTxPort": "50000", <--- 여기에 50000 입력
"usrpRxPort": "50000", <--- 여기에 50000 입력
"mobilePort": "51000", <--- 기존 USRP 번호를 입력하세요 (예 : 51000) 기존 DVS Mobile 에서 이 번호로 접속
"wsPort": "443",
"keyDir": "./ssl/",
"siteroot": "./arRoot",
"logFileName": "/var/log/dvswitch/Analog_Reflector.log",
"logLevel": "2",
"disallowUnknownClients": false,
"brokerURL": "mqtt://localhost:1883",
"rightsMask": "4",
"autoMute": true,
"clientModes": ["DMR", "STFU", "DSTAR|D-Star", "NXDN", "P25", "YSF", "ASL|AllStar", "Intercom"],
"bridges": {
"asl": [
{"node" : "1999", "address" : "127.0.0.1", "rxPort" : "34001", "txPort" : "32001", "rights" : 3, "amiUserName" : "admin", "amiSecret" : "llcgi"}
],
"ab" : [
{"name" : "DMR", "address" : "127.0.0.1", "rxPort" : "51100", "txPort" : "51103", "rights" : 1},
{"name" : "D-Star", "address" : "127.0.0.1", "rxPort" : "52100", "txPort" : "52103", "rights" : 1},
{"name" : "NXDN", "address" : "127.0.0.1", "rxPort" : "53100", "txPort" : "53103", "rights" : 1},
{"name" : "P25", "address" : "127.0.0.1", "rxPort" : "54100", "txPort" : "54103", "rights" : 1},
{"name" : "YSF", "address" : "127.0.0.1", "rxPort" : "55100", "txPort" : "55103", "rights" : 1}
]
}
}
You want to be careful editing this file. Spaces and punctuation matter.
15-1 : Change the dmrID to your DMR ID
15-2 : Change mobilePort to the number you first saw in DVS. Or leave it at 12346 and change the setting in DVSM.
15-3 : Save your work Control X, y, Enter
Let's check your work
정상적으로 설정이 되었는지 확인
16 : ./Analog_Reflector -f Analog_Reflector.json
에러 없이 실행되어야 합니다
만약 에러가 발생되면
16-1 : sudo cp Analog_Reflector.json.save Analog_Reflector.json
를 실행하고 다시 15번 실행하세요
Any errors? No, continue? Yes, stop and restore the backup cp Analog_Reflector.json.save Analog_Reflector.json
에러가 없으면
16-2 : Control C Ctrl-C 빠져 나옵니다
5단계] 사용자 등록
다음은 자신의 계정 등록입니다 매우 중요합니다
We will now add your account to Analog_Reflector.
17-1 : sudo ./Analog_Reflector user Your_CALLSIGN Your_DMRID Your_DMRID+SSID Your_password 3
Example:
17-2 : 반드시 아래와 같이 입력하시기 바랍니다
규칙 : sudo ./Analog_Reflector user 콜싸인 DMRID DMRID+고유숫자두자리 비밀번호 권한등급
예시 : sudo ./Analog_Reflector user KC4DEA 3157999 315799901 DoNotTell 11
비밀번호는
- 웹버젼에 접속할려면 콜싸인 입력 후 비밀번호 입력을 해야 합니다
- 대소문자 구분하여 입력하시고 기록해 두시기 바랍니다
권한등급은 아래와 같습니다
- 1 : 송신 가능
- 2 : TG 변경 가능
- 8 : SYSOP (관리자 권한)
위 세개 숫자 합이 11 입니다
그래서 관리자 권한은 11입니다
등록 안된 분이 접속하면 듣기만 가능합니다
If all is well you will see: User successfully created.
Let's try to login to ANalog_Reflector with hUC:
18 : sudo ./Analog_Reflector -f Analog_Reflector.json
On another computer with a Web Browser:
19-1 : 웹브라우즈 창에 자신의 서버 주소를 입력해보세요 : https://192.168.0.55
19-2 : 19-1 접속이 안되면 다음과 같이 입력해보세요 : https://192.168.0.55/html/hUC-min.html
19-2 : 콜싸인 입력 (예 : DS5QDR)
19-3 : 비밀번호 입력 DoNotTell
You should see the hUC screen and be prompted for your callsign and password.
Yes? You are up and running.
20 : Control-C
We will now start Analog_Reflector in the background (as a service)
21 : sudo systemctl start analog_reflector
위 명령어 실행 시 에러가 없어야 합니다
Any error messages? No, continue
아래 명령어를 입력하면 다음과 같이 표시 됩니다
21 : sudo systemctl status analog_reflector
You will see:
● analog_reflector.service - Analog Reflector Service
Loaded: loaded (/lib/systemd/system/analog_reflector.service; enabled; vendor preset: enabled)
Active: active (running) since Tue 2021-03-02 08:50:36 EST; 2s ago
Process: 20030 ExecStartPre=/bin/sh -c echo "Starting Analog Reflector: [`date +%T.%3N`]" >> /var/log/netcheck (code=exited, status=0/SUCCESS)
Main PID: 20034 (Analog_Reflecto)
Tasks: 10 (limit: 2062)
CGroup: /system.slice/analog_reflector.service
└─20034 /opt/Analog_Reflector/Analog_Reflector
Mar 02 08:50:36 dvswitch-server systemd[1]: Starting Analog Reflector Service...
Mar 02 08:50:36 dvswitch-server systemd[1]: Started Analog Reflector Service.
The most important line is:
active (Running) 이 표시되면 정상입니다
Active: active (running) since Tue 2021-03-02 08:50:36 EST; 2s ago
OK, you are setup and ready to start using hUC with your DVSwitch Server.
Reboot the server and start playing.
22. sudo reboot 재실행하시고 웹버젼 즐기시면 됩니다
23. 정상 작동 및 접속 되는지 확인하신 후
6단계] 각 모드별 TG/Ref 수정
24. TG 편집
DVSwitch에 접속한 후 유첨 파일로 편집 혹은 대체 바랍니다
절대 양식 바꾸거나 변형 시키면 TG가 보이지 않습니다
24-1 : sudo nano /opt/Analog_Reflector/arRoot/modes/DMR_node_list.json
24-2 : sudo nano /opt/Analog_Reflector/arRoot/modes/DSTAR_node_list.json
24-3 : sudo nano /opt/Analog_Reflector/arRoot/modes/NXDN_node_list.json
24-4 : sudo nano /opt/Analog_Reflector/arRoot/modes/P25_node_list.json
24-5 : sudo nano /opt/Analog_Reflector/arRoot/modes/YSF_node_list.json
7단계] 교신
수고하셨습니다
8단계] 삭제 방법
sudo apt-get remove --purge analog_reflector
DS5QDR 73!
'DVSwitch' 카테고리의 다른 글
| 2021-03-08 DVSwitch : hUC 웹버젼 DMR Plus 설정 방법 (0) | 2021.03.08 |
|---|---|
| 2021-03-04 DVSwitch : 송수신 음량 조정 방법 (0) | 2021.03.04 |
| 2020-12-16 DVSwitch : 윈도우 PC용 pyUC 버젼 0.95 (20.12.29일자) (9) | 2020.12.16 |
| 2020-12-12 DVSwitch : MB 1개에 AB 2개 연결 시 (0) | 2020.12.12 |
| 2020-11-27 DVSwitch : dvsMU DVSwitch Multi User by HL5KY (10) | 2020.11.27 |
DS5QDR Heonmin Lee in Korea
DV 통신 경험 공유 Mode : DMR, DSTAR, YSF, XLX, YSF, M17, AllStarLink, EchoLink Software : DVSwich, USRP Client, Last Heard, MiniPi, MiniMT, VuMeter, DVPi, Pi-Star