


[출처 : https://www.abelectronics.co.uk/kb/article/31/set-a-static-ip-address-on-raspberry-pi-os-bookworm]
Set a static IP Address on Raspberry Pi OS Bookworm
Tutorial showing how to setup a static network IP address on Raspberry Pi OS Bookworm released October 2023 using NetworkManager
www.abelectronics.co.uk
Debian 12 Bookworm은 고정 IP 설정 방법니 변경되었습니다
아래 내용 참고하세요
내용 이해가 어려우면 제일 아래 명령어 만 정리되어 있!습니다.
참고하세요!
Set a static IP Address on Raspberry Pi OS Bookworm
How to use a static network IP Address on the Raspberry Pi
This tutorial details how to set up a static network IP address on the Ethernet or WiFi connection on the Raspberry Pi OS Bookworm image, released October 2023, from https://www.raspberrypi.org/software/operating-systems/.
With the release of Raspberry Pi OS Bookworm, networking on the Raspberry Pi was changed to use NetworkManager as the standard controller for networking, replacing the previous dhcpcd system. NetworkManager includes a command line tool called "nmcli," which can control NetworkManager and report on the network status.
In this tutorial, we will use "nmcli" to configure the network to use a static IP address.
We will give the Raspberry Pi a static IP address of 10.0.0.220. The gateway address will be set at 10.0.0.1, and the DNS server will also be set to 10.0.0.1
Step 1:
The first step is to find the name of the network interface you want to set as static. Run the following command in a terminal to display a list of available network interfaces.
sudo nmcli -p connection showYou should see a listing like the one below.
======================================
  NetworkManager connection profiles
======================================
NAME                UUID                                  TYPE      DEVICE
----------------------------------------------------------------------------
Wired connection 1  bd220d18-7d6a-36a5-9820-4f67de2c01fc  ethernet  eth0
mywifi              2359440b-8991-4c86-a905-b011dced4587  wifi      wlan0
lo                  c29ba7c5-98ff-4fa0-8d8e-06b30b8ec384  loopback  lo
The default name for the wired ethernet connection is "Wired connection 1". The WiFi connection will typically have the name of your WiFis SSID. If your Raspberry Pi uses different names for the network connections or you would like to change your WiFi IP address, replace "Wired connection 1" with the correct name in the following commands.
Step 2:
Now we know the name of the network connection we want to update, we can send three commands to set the new IP address, Gateway and DNS server.
sudo nmcli c mod "Wired connection 1" ipv4.addresses 10.0.0.220/24 ipv4.method manual

sudo nmcli con mod "Wired connection 1" ipv4.gateway 10.0.0.1

sudo nmcli con mod "Wired connection 1" ipv4.dns "10.0.0.1"
If you want to use multiple DNS servers, you can add them separated by commas; for example, to use Google's DNS servers, use the following.
sudo nmcli con mod "Wired connection 1" ipv4.dns "8.8.8.8,8.8.4.4"
The same method can be used for adding multiple IP addresses to the same network connection; for example, the following command would assign IP addresses 10.0.0.220, 10.0.0.221 and 10.0.0.222.
sudo nmcli c mod "Wired connection 1" ipv4.addresses "10.0.0.220/24, 10.0.0.221/24, 10.0.0.222/24" ipv4.method manual
Step 3:
When you have finished updating the network settings on your Raspberry Pi, you can restart the network connection with the following command.
sudo nmcli c down "Wired connection 1" && sudo nmcli c up "Wired connection 1"
Note: If you are using SSH to connect to your Raspberry Pi, running the above command will cause the SSH session to end if the IP address changes.
You can find all of the configuration settings for a network connection with the following command:
nmcli -p connection show "Wired connection 1"To change the network connection from static to automatic, run the following commands:
sudo nmcli con modify "Wired connection 1" ipv4.method auto
sudo nmcli c down "Wired connection 1" && sudo nmcli c up "Wired connection 1"
간편 설정 방법
1단계] 자신의 인터넷 상태 확인
sudo nmcli -p connection show
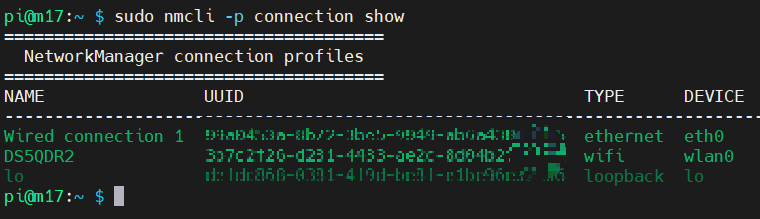
위 내용을 보면
- 첫째줄 Wired connection 1 : 유선 연결 되어 있다는 표시
- 둘째줄 DS5QDR2 : 무선으로도 연결되어 있다는 표시 (자신의 무선 인터넷 SSID 에 따라 다르게 표시됨)
2단계] 고정 인터넷 IP 설정
만약 자신의 IP가 192.168.0.xxx 로 구성 시
## 유선 연결
sudo nmcli c mod "Wired connection 1" ipv4.addresses 192.168.0.160/24 ipv4.method manual
sudo nmcli con mod "Wired connection 1" ipv4.gateway 192.168.0.1
sudo nmcli con mod "Wired connection 1" ipv4.dns "192.168.0.1"
sudo nmcli c down "Wired connection 1"
sudo nmcli c up "Wired connection 1"
## 무선 DS5QDR2에 대해
sudo nmcli c mod "DS5QDR2" ipv4.addresses 192.168.0.160/24 ipv4.method manual
sudo nmcli con mod "DS5QDR2" ipv4.gateway 192.168.0.1
sudo nmcli con mod "DS5QDR2" ipv4.dns "192.168.0.1"
sudo nmcli c down "DS5QDR2"
sudo nmcli c up "DS5QDR2"
만약 자신의 IP가 192.168.1.xxx 로 구성 시
## 유선 연결
sudo nmcli c mod "Wired connection 1" ipv4.addresses 192.168.1.160/24 ipv4.method manual
sudo nmcli con mod "Wired connection 1" ipv4.gateway 192.168.1.1
sudo nmcli con mod "Wired connection 1" ipv4.dns "192.168.1.1"
sudo nmcli c down "Wired connection 1"
sudo nmcli c up "Wired connection 1"
## 무선 DS5QDR2에 연결
sudo nmcli c mod "DS5QDR2" ipv4.addresses 192.168.1.160/24 ipv4.method manual
sudo nmcli con mod "DS5QDR2" ipv4.gateway 192.168.1.1
sudo nmcli con mod "DS5QDR2" ipv4.dns "192.168.1.1"
sudo nmcli c down "DS5QDR2"
sudo nmcli c up "DS5QDR2"
3단계] 연결 확인
ifconfig
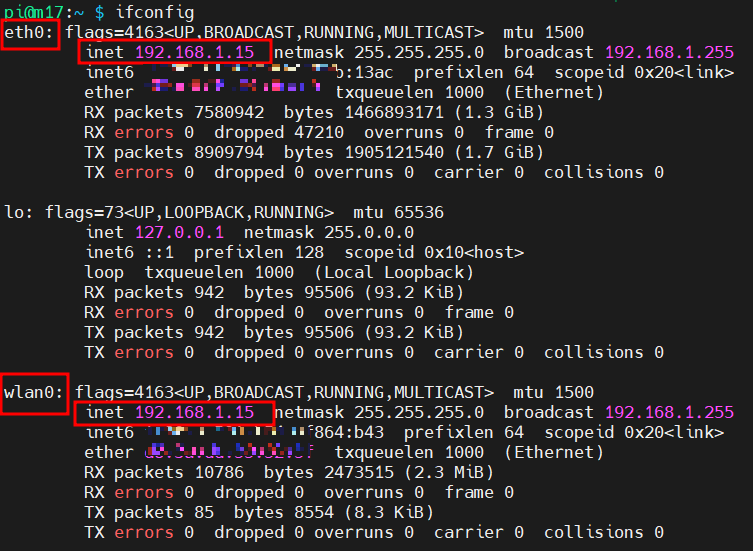
eth0 유선 IP이고 wlan0 무선 IP 모두 설정한 값으로 고정 되어 있습니다
이상입니다.
DS5QDR 73!
'RaspberryPi' 카테고리의 다른 글
| 2024-02-20 RPi : how to force USB Soundcard order on RPi (0) | 2024.02.20 |
|---|---|
| 2023-10-09 RPi : Install Putty and SSH key-based authentication (0) | 2023.10.09 |
| 2023-10-07 RPi : Raspberry Pi Zero 2W 출시 및 활용 (0) | 2023.10.07 |
| 2023-02-01 RPi : Low Voltage Warning on the Raspberry Pi (0) | 2023.02.01 |
| 2023-01-29 RPi : How to Back Up Your Raspberry Pi as a Disk Image (0) | 2023.01.29 |

DS5QDR Heonmin Lee in Korea
DV 통신 경험 공유 Mode : DMR, DSTAR, YSF, XLX, YSF, M17, AllStarLink, EchoLink Software : DVSwich, USRP Client, Last Heard, MiniPi, MiniMT, VuMeter, DVPi, Pi-Star